Table of Contents
Tools like Eclipse, NetBeans, and Visual Studio provide various mechanisms, known as plugins, for customizing the appearance and behavior of the editing environment. Plugins can therefore be designed to insert Clepsydra's WCET back-annotations directly into the editor window. They can also generate continuously updated control flow visualizations produced by Cascade. As the developer edits the source code, the plugin can run its analysis in the background and then automatically update the environment to match the changes. Watch the Volta screencast for a “live” demonstration of this feature.
Clepsydra includes a prototype of such a plugin for the jEdit editor. Figure 5.1 shows a screenshot of the jEdit plugin in action. The red text attached to each statement indicates the number of cycles that the statement consumes in the worst case. (The cycle counts in this example are based on JOP, but other Java-specific processors would produce similar results.) Note that these back-annotations were inserted automatically by the plugin following a WCET analysis of the code. The plugin re-runs the analysis and generates new back-annotations whenever the developer saves changes to disk.
Figure 5.1. This screenshot shows a Clepsydra plugin for the jEdit text editor. The red text, which was inserted automatically by the plugin, indicates worst-case cycle consumption.

The jEdit plugin includes an Ant script that simplifies the installation process. First, make sure that the script's jedit.jars.dir property points to the location of jEdit's plugin JAR directory. (The default value should work fine.) Next, run ant install. This will build the plugin JAR and install it to the plugin directory. If you have previously installed the plugin, you will then need to either restart jEdit or use Activator to reload the plugin.
Also note that Clepsydra requires various third-party libraries, so the installation command copies them to the jEdit directory, as well. The list of dependent libraries is stored in the plugin.edu.uci.eecs.doc.clepsydra.plugins.jedit.Plugin.jars property of Clepsydra.props; it must be updated if Clepsydra's dependencies ever change.
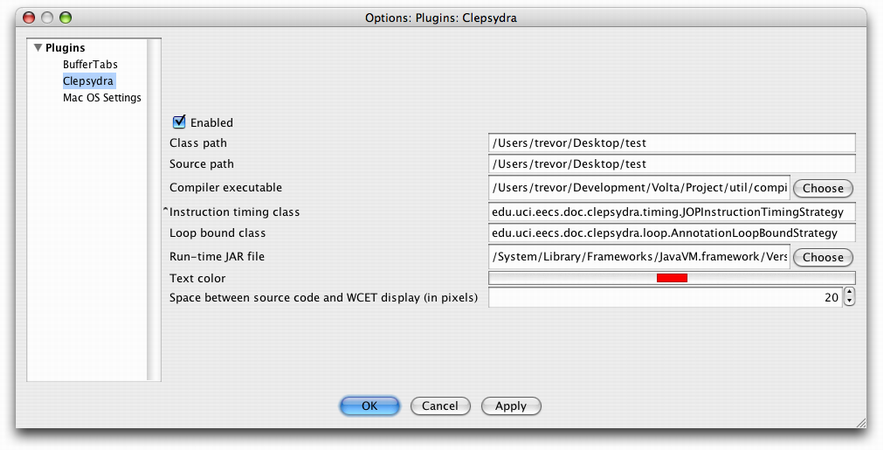
After installation, Clepsydra must be configured by choosing → from the jEdit menu, which will bring up a dialog box like the one in Figure 5.2. The options are:
- Enabled
Globally enables or disables the plugin.
- Class path
A list of paths to search when loading classes during the WCET analysis. Each path must be separated by the system path separator (e.g.,
:).- Source path
A list of paths to search when compiling the source code. Each path must be separated by the system path separator (e.g.,
:).- Compiler executable
The path to a compiler capable of understanding WCET statement annotations, such as the one described in Chapter 7.
- Instruction timing class
The strategy to use for modeling the processor.
- Loop bound class
The strategy to use for determining loop bounds.
- Run-time JAR file
The location of a JAR containing Java's run-time classes (e.g.,
java.lang.Object).- Text color
The color to use for back-annotations.
- Space between source code and WCET display
The size of the margin, in pixels, between the end of the line and its back-annotation.
